> ## Documentation Index
> Fetch the complete documentation index at: https://neardocs-update-rpc-openapi.mintlify.site/llms.txt
> Use this file to discover all available pages before exploring further.
# Your First Smart Contract
> Create your first smart contract in Rust and deploy it to the NEAR testnet.
export const Github = ({url, start, end, fname, language, withSourceLink = true}) => {
const [code, setCode] = useState(null);
function toRaw(ref) {
const fullUrl = ref.slice(ref.indexOf('https'));
const [url] = fullUrl.split('#');
const [org, repo, , branch, ...pathSeg] = new URL(url).pathname.split('/').slice(1);
return `https://raw.githubusercontent.com/${org}/${repo}/${branch}/${pathSeg.join('/')}`;
}
async function fetchCode(url, fromLine, toLine) {
let res;
if (typeof window !== 'undefined') {
const validUntil = localStorage.getItem(`${url}-until`);
if (validUntil && Number(validUntil) > Date.now()) {
res = localStorage.getItem(url);
}
}
if (!res) {
try {
res = await (await fetch(url)).text();
if (typeof window !== 'undefined') {
localStorage.setItem(url, res);
localStorage.setItem(`${url}-until`, String(Date.now() + 60000));
}
} catch {
return 'Error fetching code, please try reloading';
}
}
let body = res.split('\n');
const from = fromLine ? Number(fromLine) - 1 : 0;
const to = toLine ? Number(toLine) : body.length;
body = body.slice(from, to);
const precedingSpace = body.reduce((prev, line) => {
if (line.length === 0) return prev;
const spaces = line.match(/^\s+/);
if (spaces) return Math.min(prev, spaces[0].length);
return 0;
}, Infinity);
return body.map(line => line.slice(precedingSpace === Infinity ? 0 : precedingSpace)).join('\n');
}
function buildSourceUrl(url, start, end) {
const base = url.split('#')[0];
if (start && end) return `${base}#L${start}-L${end}`;
if (start) return `${base}#L${start}`;
return base;
}
useEffect(() => {
const rawUrl = toRaw(url);
fetchCode(rawUrl, start, end).then(res => setCode(res));
}, [url, start, end]);
const sourceUrl = buildSourceUrl(url, start, end);
const fileName = fname ?? sourceUrl.split('/').pop();
return
{code === null ?
Loading...
:
{code}
}
{withSourceLink &&
}
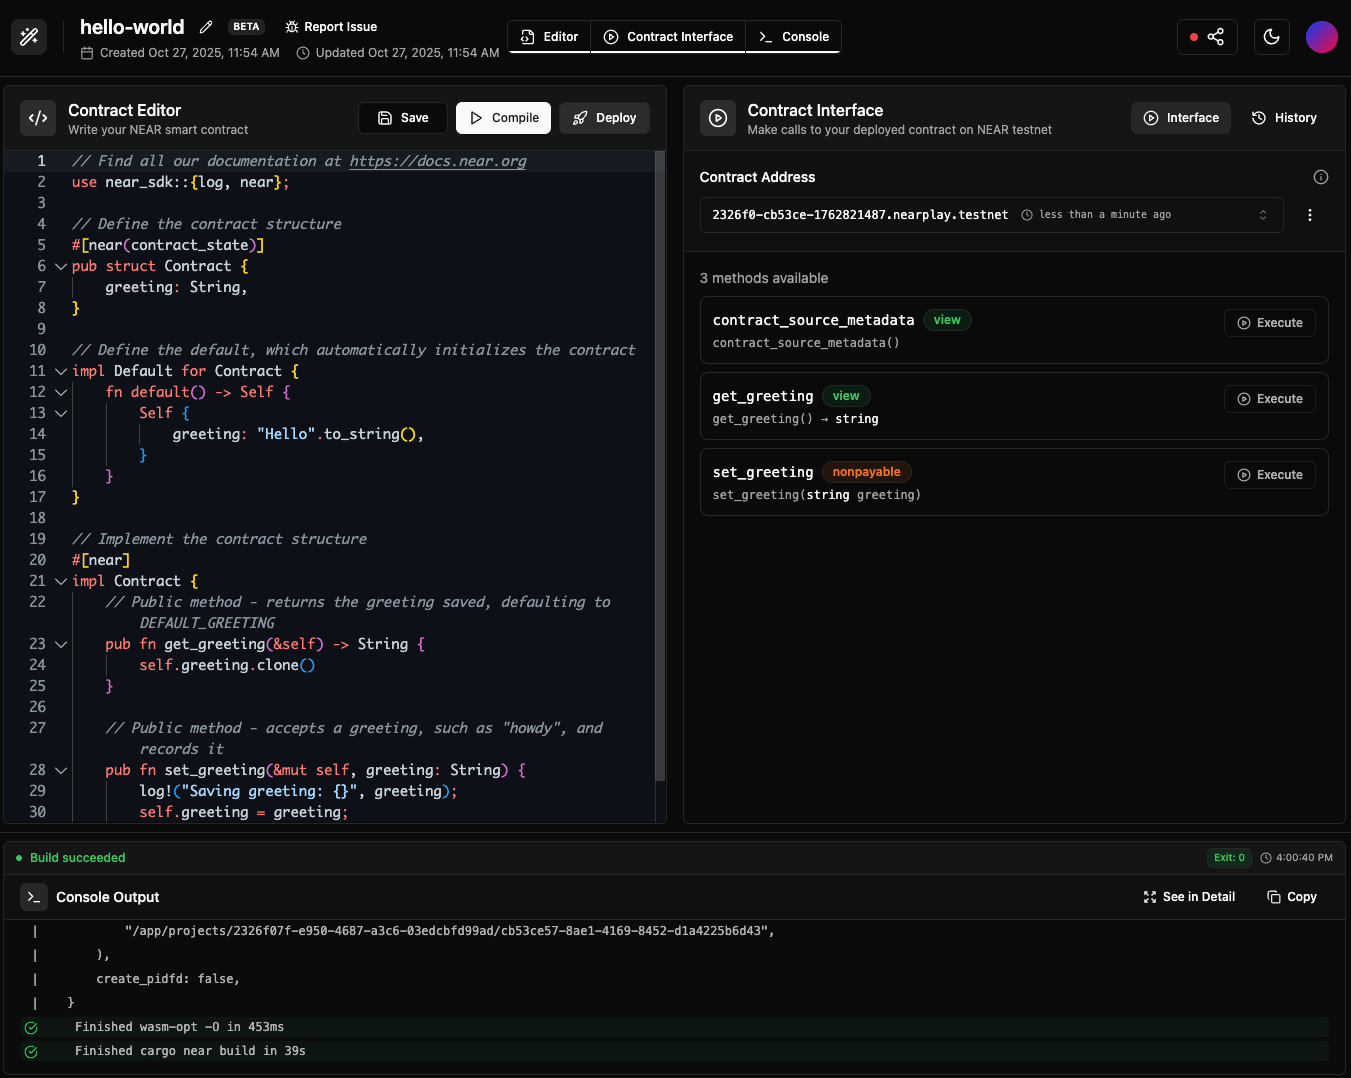 [](https://nearplay.app/embed/3450a8a0-57dc-4d3a-b5d0-7bed58a0c2a9)
***
## Prerequisites
Before starting, make sure to set up your development environment.
```bash theme={"theme":{"light":"github-light","dark":"github-dark"}}
# Install Rust: https://www.rust-lang.org/tools/install
curl --proto '=https' --tlsv1.2 -sSf https://sh.rustup.rs | sh
# Contracts will be compiled to wasm, so we need to add the wasm target
rustup target add wasm32-unknown-unknown
# Install NEAR CLI-RS to deploy and interact with the contract
curl --proto '=https' --tlsv1.2 -LsSf https://github.com/near/near-cli-rs/releases/latest/download/near-cli-rs-installer.sh | sh
# Install cargo near to help building the contract
curl --proto '=https' --tlsv1.2 -LsSf https://github.com/near/cargo-near/releases/latest/download/cargo-near-installer.sh | sh
```
***
## Creating the contract
Create a smart contract with the `cargo near` scaffolding tool by following its instructions:
```bash theme={"theme":{"light":"github-light","dark":"github-dark"}}
# Create a new contract called "auction"
cargo near new auction
```
[](https://nearplay.app/embed/3450a8a0-57dc-4d3a-b5d0-7bed58a0c2a9)
***
## Prerequisites
Before starting, make sure to set up your development environment.
```bash theme={"theme":{"light":"github-light","dark":"github-dark"}}
# Install Rust: https://www.rust-lang.org/tools/install
curl --proto '=https' --tlsv1.2 -sSf https://sh.rustup.rs | sh
# Contracts will be compiled to wasm, so we need to add the wasm target
rustup target add wasm32-unknown-unknown
# Install NEAR CLI-RS to deploy and interact with the contract
curl --proto '=https' --tlsv1.2 -LsSf https://github.com/near/near-cli-rs/releases/latest/download/near-cli-rs-installer.sh | sh
# Install cargo near to help building the contract
curl --proto '=https' --tlsv1.2 -LsSf https://github.com/near/cargo-near/releases/latest/download/cargo-near-installer.sh | sh
```
***
## Creating the contract
Create a smart contract with the `cargo near` scaffolding tool by following its instructions:
```bash theme={"theme":{"light":"github-light","dark":"github-dark"}}
# Create a new contract called "auction"
cargo near new auction
```
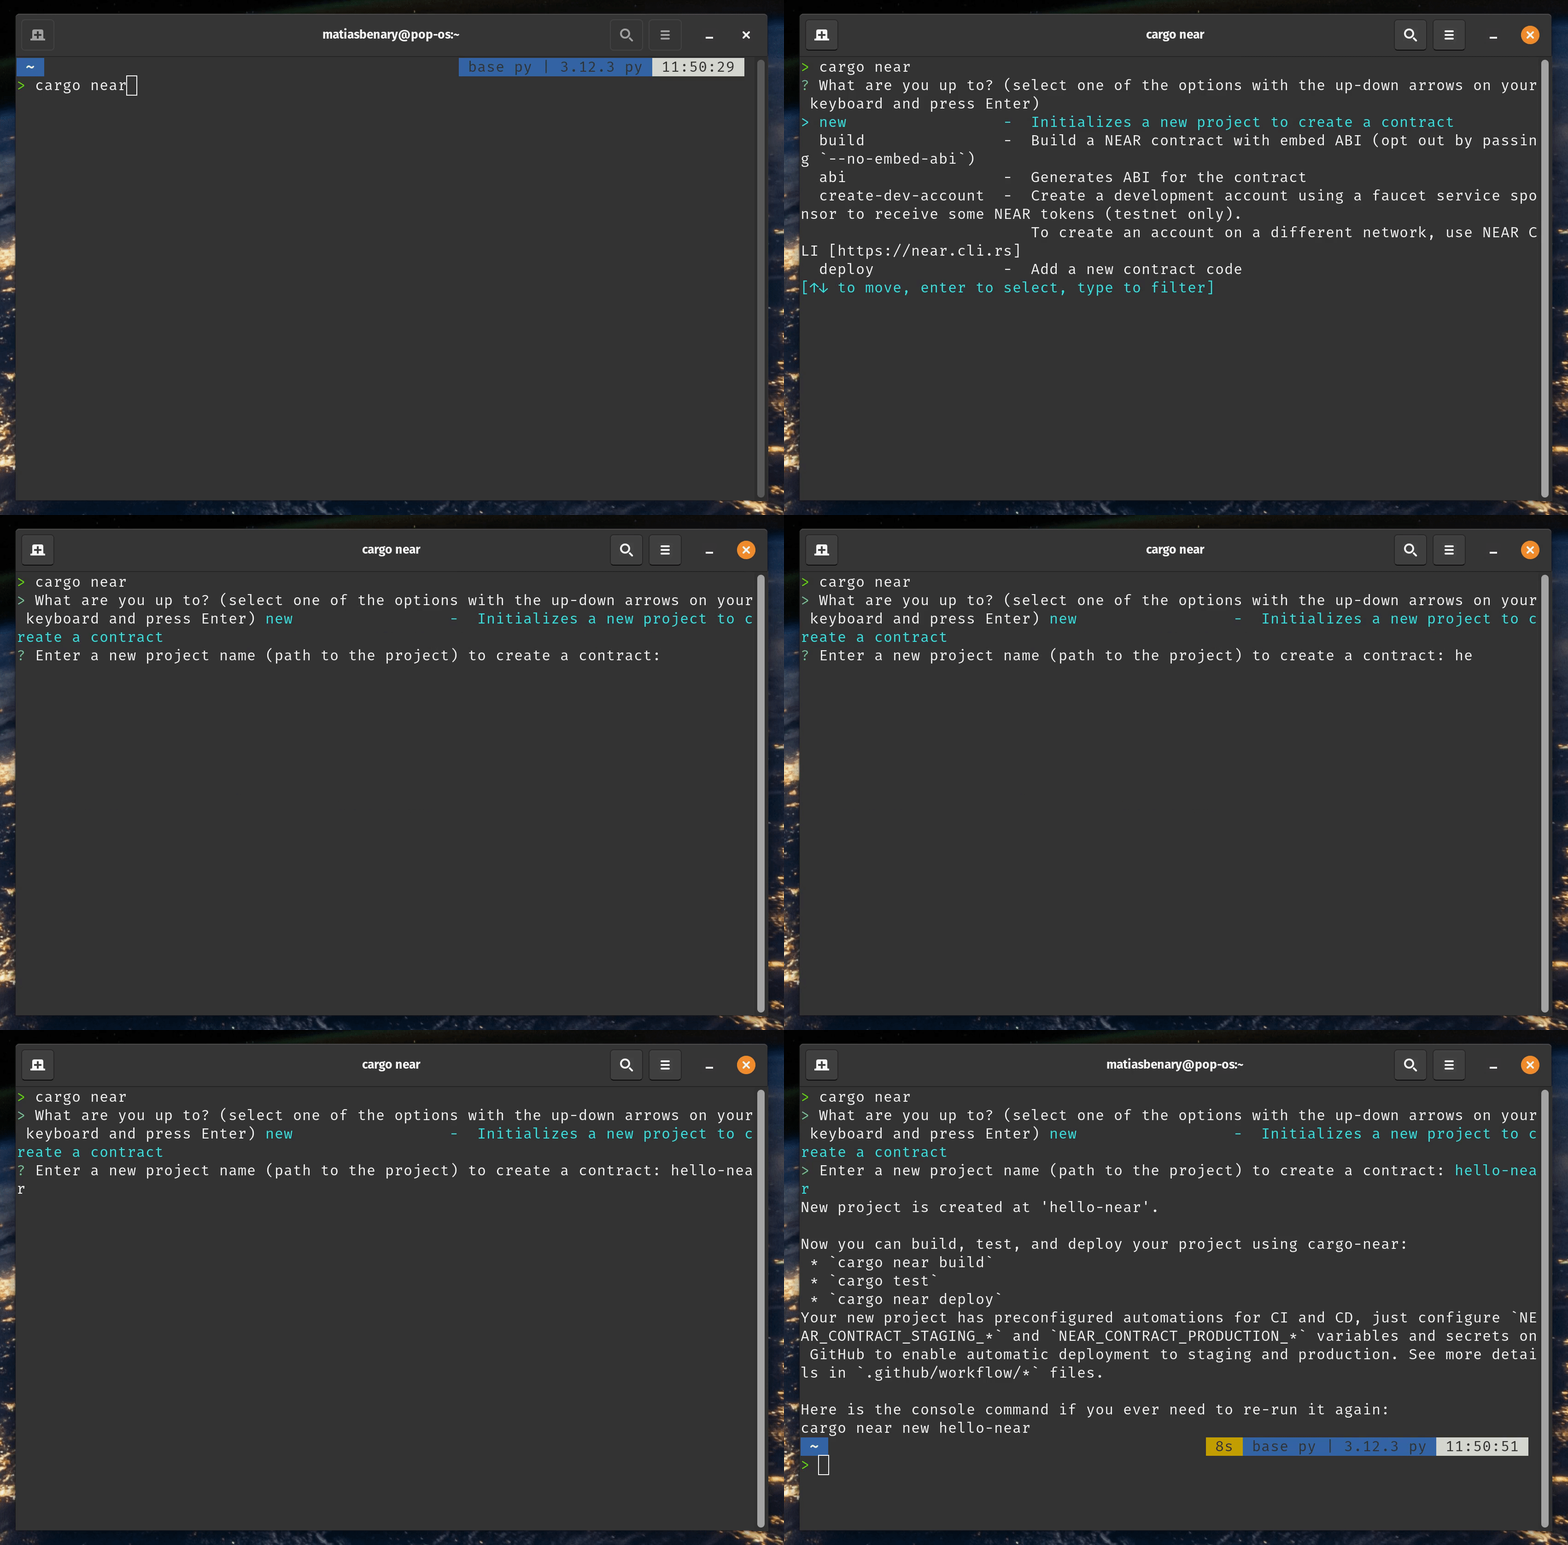 *Creating a project using `cargo near new`*
For this tutorial, we chose to name the project `auction`, but feel free to use any name you prefer.
***
## Build and deploy the contract
Let's build the contract, create a NEAR testnet account, and deploy the contract to it.
```bash theme={"theme":{"light":"github-light","dark":"github-dark"}}
# Run the sandbox tests to verify the contract works as expected
cargo test
# Build the contract
cargo near build non-reproducible-wasm
# Create a free testnet account, replace `` with your desired account name
near create-account --useFaucet
# Deploy the contract to the account
near deploy ./target/near/auction.wasm
```
**Already have a testnet account?**
If you already have a `testnet` account and would like to use it instead, you can log in with the command `near login`.
When working in `WSL`—or another headless Linux environment—you might encounter issues creating an account because the CLI tries to save keys to the system keychain.
In such cases, you can try the following command to create the account:
```bash theme={"theme":{"light":"github-light","dark":"github-dark"}}
near account create-account sponsor-by-faucet-service autogenerate-new-keypair save-to-legacy-keychain network-config testnet create
```
**Congrats!** Your contract now lives in the NEAR testnet network.
***
## Initialize the auction
The contract stores the highest bid, auction end time, auctioneer address, and a flag to track whether proceeds have been claimed. Its `init` function sets these values when the contract is first initialized:
Initialize the auction by setting its end time and designating the auctioneer to receive the funds:
```bash theme={"theme":{"light":"github-light","dark":"github-dark"}}
# Get a timestamp for 5 minutes from now (in nanoseconds)
FIVE_MINUTES_FROM_NOW=$(( $(date +%s%N) + 5 * 60 * 1000000000 ))
# Initialize the auction
near call init "{\"end_time\": \"$FIVE_MINUTES_FROM_NOW\", \"auctioneer\": \"influencer.testnet\"}" --useAccount
```
Feel free to replace `influencer.testnet` with any valid testnet account—this is where the winning bid will be sent.
## Place and view bids
Place a bid in the auction by calling the `bid` method and attaching a NEAR deposit. The function checks whether the auction is ongoing and whether the bid is higher than the stored amount. If it is, the contract records the new bid and refunds the previous bidder.
```bash theme={"theme":{"light":"github-light","dark":"github-dark"}}
# Create a new account to place the bid
near create-account --useFaucet
# Place a bid of 0.01 NEAR
near call bid '{}' --deposit 0.01 --useAccount
```
In this example, use the `` account (remember to rename it) to call the `bid` function and attach a deposit of `0.01` NEAR.
### View the highest bid
The `get_highest_bid` function only reads from the contract state, so it does not require a transaction or signature. You can also use the contract's other view methods to query the auction end time, auctioneer, and claim status:
```bash theme={"theme":{"light":"github-light","dark":"github-dark"}}
near view get_highest_bid '{}'
```
```json theme={"theme":{"light":"github-light","dark":"github-dark"}}
{
"bidder": "",
"amount": "10000000000000000000000"
}
```
The amount is shown in `yoctoNEAR`, the smallest unit of NEAR. Since 1 NEAR equals `10^24` yoctoNEAR, the displayed amount is `0.01` NEAR.
Feel free to create more bidder accounts and place bids to see how the highest bid changes.
## Claim the proceeds
After the auction ends, anyone can call the `claim` method. It transfers the amount of the highest bid to the auctioneer and ends the auction:
```bash theme={"theme":{"light":"github-light","dark":"github-dark"}}
near call claim '{}' --useAccount
```
**Who won?**
After the auction ends, you can determine the highest bidder by calling the `get_highest_bid` method again.
***
## Frequently Asked Questions
You can deploy a contract to mainnet using the same commands. Create a mainnet account and use the `--networkId mainnet` flag in the `near` CLI commands.
The cost of deploying a contract depends on its size: approximately 1 Ⓝ per 100 KB.
Yes. Redeploy with `near deploy `. The account stays the same, and the code is updated.
Use the sandbox tests shown in this guide. They run locally in a simulated NEAR environment.
Yes. You can write smart contracts in any language that compiles to WebAssembly. Our documentation focuses on Rust, but community-maintained SDKs are available for other languages. See [supported languages](/smart-contracts/what-is#supported-languages).
***
## Moving forward
Check the auction frontend tutorial to learn how to build a simple web app that interacts with the auction contract.
Follow the auction NFT tutorial to award the highest bidder a Non-Fungible Token (NFT) and allow users to bid using Fungible Tokens (FT).
Check our Anatomy of a Contract page to understand the different components that make up a NEAR smart contract.
*Creating a project using `cargo near new`*
For this tutorial, we chose to name the project `auction`, but feel free to use any name you prefer.
***
## Build and deploy the contract
Let's build the contract, create a NEAR testnet account, and deploy the contract to it.
```bash theme={"theme":{"light":"github-light","dark":"github-dark"}}
# Run the sandbox tests to verify the contract works as expected
cargo test
# Build the contract
cargo near build non-reproducible-wasm
# Create a free testnet account, replace `` with your desired account name
near create-account --useFaucet
# Deploy the contract to the account
near deploy ./target/near/auction.wasm
```
**Already have a testnet account?**
If you already have a `testnet` account and would like to use it instead, you can log in with the command `near login`.
When working in `WSL`—or another headless Linux environment—you might encounter issues creating an account because the CLI tries to save keys to the system keychain.
In such cases, you can try the following command to create the account:
```bash theme={"theme":{"light":"github-light","dark":"github-dark"}}
near account create-account sponsor-by-faucet-service autogenerate-new-keypair save-to-legacy-keychain network-config testnet create
```
**Congrats!** Your contract now lives in the NEAR testnet network.
***
## Initialize the auction
The contract stores the highest bid, auction end time, auctioneer address, and a flag to track whether proceeds have been claimed. Its `init` function sets these values when the contract is first initialized:
Initialize the auction by setting its end time and designating the auctioneer to receive the funds:
```bash theme={"theme":{"light":"github-light","dark":"github-dark"}}
# Get a timestamp for 5 minutes from now (in nanoseconds)
FIVE_MINUTES_FROM_NOW=$(( $(date +%s%N) + 5 * 60 * 1000000000 ))
# Initialize the auction
near call init "{\"end_time\": \"$FIVE_MINUTES_FROM_NOW\", \"auctioneer\": \"influencer.testnet\"}" --useAccount
```
Feel free to replace `influencer.testnet` with any valid testnet account—this is where the winning bid will be sent.
## Place and view bids
Place a bid in the auction by calling the `bid` method and attaching a NEAR deposit. The function checks whether the auction is ongoing and whether the bid is higher than the stored amount. If it is, the contract records the new bid and refunds the previous bidder.
```bash theme={"theme":{"light":"github-light","dark":"github-dark"}}
# Create a new account to place the bid
near create-account --useFaucet
# Place a bid of 0.01 NEAR
near call bid '{}' --deposit 0.01 --useAccount
```
In this example, use the `` account (remember to rename it) to call the `bid` function and attach a deposit of `0.01` NEAR.
### View the highest bid
The `get_highest_bid` function only reads from the contract state, so it does not require a transaction or signature. You can also use the contract's other view methods to query the auction end time, auctioneer, and claim status:
```bash theme={"theme":{"light":"github-light","dark":"github-dark"}}
near view get_highest_bid '{}'
```
```json theme={"theme":{"light":"github-light","dark":"github-dark"}}
{
"bidder": "",
"amount": "10000000000000000000000"
}
```
The amount is shown in `yoctoNEAR`, the smallest unit of NEAR. Since 1 NEAR equals `10^24` yoctoNEAR, the displayed amount is `0.01` NEAR.
Feel free to create more bidder accounts and place bids to see how the highest bid changes.
## Claim the proceeds
After the auction ends, anyone can call the `claim` method. It transfers the amount of the highest bid to the auctioneer and ends the auction:
```bash theme={"theme":{"light":"github-light","dark":"github-dark"}}
near call claim '{}' --useAccount
```
**Who won?**
After the auction ends, you can determine the highest bidder by calling the `get_highest_bid` method again.
***
## Frequently Asked Questions
You can deploy a contract to mainnet using the same commands. Create a mainnet account and use the `--networkId mainnet` flag in the `near` CLI commands.
The cost of deploying a contract depends on its size: approximately 1 Ⓝ per 100 KB.
Yes. Redeploy with `near deploy `. The account stays the same, and the code is updated.
Use the sandbox tests shown in this guide. They run locally in a simulated NEAR environment.
Yes. You can write smart contracts in any language that compiles to WebAssembly. Our documentation focuses on Rust, but community-maintained SDKs are available for other languages. See [supported languages](/smart-contracts/what-is#supported-languages).
***
## Moving forward
Check the auction frontend tutorial to learn how to build a simple web app that interacts with the auction contract.
Follow the auction NFT tutorial to award the highest bidder a Non-Fungible Token (NFT) and allow users to bid using Fungible Tokens (FT).
Check our Anatomy of a Contract page to understand the different components that make up a NEAR smart contract.
At the time of this writing, this example works with the following versions:
* rustc: `1.86.0`
* near-cli-rs: `0.22.0`
* cargo-near: `0.16.1`